Tankwa Camino what is it? what to expect - what worked and did not work for me

What to expect - what worked for me and what did not.
I hope you will find some value in this blog as you prepare for you Tankwa Camino - good luck and go to have fun and to escape from the busy world. Its a privilege to walk in the Tankwa.
 |
| Image Kim Williams |
A little Background:
I did try to read up about this walk but no one really seemed to be able to sum it up for me and what to expect? I really went into this blind. In essence that is the message really - it will be different for everyone, it is what you make of it and what you take out of it and more importantly what you leave behind. The experience is not something you can label nor bottle. Its a personal journey for many different reasons or goals.
 |
| Image Kim Williams |
Usually my goals on my adventures is to get to the top, to summit, to plant my charity and SA Flags. To sit on top of the world and reflect. The goal is something you can visually see, spot on google maps, an achievement that few have done. Its always the incredible journey to the top that makes for the special memories for sitting on the top of high altitude mountains is fleeting, the lower mountains the moment can linger. This Camino was different there was no mountain to climb in the physical sense, this was not even a hike or a trail. It was a long hard and monotonous road that pounded day in and day out at your feet. Many times it felt as though I was on the road to no-where. Was that the point? Going nowhere slowly? What was the goal, what was there to achieve for me, I could not see anything that I was plodding towards, it was a very new and a strange feeling. When the weather changed and we had rain, floods and high winds and sandstorms I got excited, I felt alive and challenged.
 |
| Image Kim Williams |
For me it was an opportunity to embark on another adventure to clear the mind and replenish the soul. Some me time surrounded by the mountains I love. It was also an opportunity to do some good for a cause close to my heart. Finally it was an opportunity to showcase our beautiful country and more especially to share our beautiful Karoo and our uniquely South African diverse culture. Did I get more than this? yes, I think I did. I saw the Tankwa Karoo no I lived it, felt it, my soul moved as I watched the huge expansive plains and horizons on fire as the sun set, the clear nights, howling jackals breathing life into the night, the breathtaking stars reminding us of how small we really are and that we are far from alone. I breathed in the Karoo dust and early morning fynbos as the horizons burst with exploding colours just for me. For 10 days the Karoo ran in my veins, I became one with Africa, its soil, its rivers, it soul. One with the Tankwa and its indescribable ancient and unique beauty. I left a piece of my soul there and need to go back and spend more time in the quietness. Was that not the point? The goals are within not visible to anyone else but you.
 |
| Image Kim Williams |
We all know how expensive it has become for South African's to travel abroad and quiet frankly these trips are out of reach for most South Africans so I was looking for an affordable South African adventure, something that everyone could enjoy and offer a challenge at the same time. The Tankwa Camino fitted the bill and so I began my planning. I had never done a desert walk let alone trekked through the Tankwa Karoo so I was super excited.
No one seemed to be able to offer any solid advice on the best way to train and prepare for this event, however what did become obvious during the 10 days was that the trail runners and runners seemed to fair better than the hikers. what I seem to be able to gauge from this was that the training most of us had done was not really the correct training and that perhaps the best way to train for this would be to put your comfie sneakers on, your backpack and spend up to 8 hours training on uneven dirt roads of 20 to 30 km long. If you are able to put in a weekend of long walking therefore walking for 2-3 days everyday would be greatly beneficial and increase your enjoyment of the walk. Try out different well worked in shoes/boots and take along more than one pair on the trip to alternate.
 |
| Image Kim Williams |
For me I had picked up an annoying and painful foot problem. I had developed plantar fasciitis under both my feet for a month leading to the event. My heavy safety work boots were not helping and had I believe largely contributed to the problem. My personal trainer worked hard on stretching me as I have an underlying back problem (I broke my neck in a water ski-ing accident at 18 and had concussion of the spinal cord resulting in temporary paralysis, I also had damaged 3 of my vertebrae in my lumbar region which has lead to what layman refer to as "slipped discs".) I have had continuous back pain since I was 18, some days making it really difficult to get out of bed as I am unable to move and have to roll in a ball to get up off the bed. Keeping fit and active keeps everything oiled and allows me to do all the crazy things I do. However I have put on weight in the last 5 years as I go through menopause and this has not helped. Since January I have been going 2x weekly to gym for my sessions with my Sports Scientist personal trainer and all we have done is stretch. The result is that I had not taken any painkillers for 4 months and I no longer have pain in my back or legs in the mornings when I get out of bed, for me this is a miracle. Oh and I can now touch my feet for the first time!
 |
| Image Kim Williams |
Now that I am back from the Tankwa we will pick up the pace and hit the exercises hard so I will loose weight, tone and strengthen getting myself ready for trekking through deep snow and ice at high altitude. I look forward to getting my body back and control of my muscles. In my day I was a runner even winning a silver and coming in 9th in a race but stopped running after I suffered a stroke at 26 years old only weighing 49 kg and supper fit, luckily I recovered very well and only when I am tired do I become a little clumsy, my right foot drags and my speech is mildly affected. At the time I lost most of the vision in my left eye. Thankfully I made a full and remarkable recovery and since then have never had another problem and my eye sight recovered 95%. I understand how precious life is and how quickly it can end especially doing the work I do. I see death daily, I watch lives end and crumble. This is why I live everyday as an adventure, savoring life's precious gifts. I have one goal only in life and that is to be happy. I do things to make me happy.
 |
| Image Kim Williams |
I took along my old hi-tech faithfuls which are well worn in, my new hiking boots which offered great arch and ankle support and I have worked them in on a couple of hikes, my sports stretch takkie/sandals and my outdoor hi-tech sandals.
 |
| Image Kim Williams |
My biggest regret was that I left my comfortable soft cross trainers at home. I believe that this would have been the ideal walking shoes for me and maybe I would not have suffered quiet as much. I never found myself breathless nor was this a mental challenge for me. I have done far harder and exhausting adventures and my daily work alone is both physically and mentally challenging. I wear hard and heavy steel capped boots for up to 18 hours or more a day. I wear heavy, hot and clumsy big fire boots. At times I have had to stand for more than 14 hours without taking the weight off my feet during a huge fire call or rescue. My feet are therefore conditioned for spending long periods of time on them. I walk fairly often and hike at least 3 times or more a month. I go to gym 3 to 4 times a week. I try to put in a 2 km swim 2x weekly between my night shifts. So even though I am carrying a little extra weight I am physically and "cardio" fit. Just before I left for the Tankwa, in heavy bunker gear, I walked up 13 flights of stairs with another male fire fighters (half my age!) and rescued 4 humans and 3 dogs from the roof of a burning building so I knew I was fit enough.
 |
| Image Kim Williams |
For me my feet failed and I walked in constant pain. It felt as though I had a 100 candles burning under my feet and every bone cried out for me to stop. By day 8 my feet were so swollen, in fact the swelling extended to my calves and I could not squat, therefore bend my knees. it was very frustrating. I am not the most patient of people especially with myself, so this was really difficult for me to deal with. The first 2 days I took it easy, wanting to enjoy every moment and came in around 15h00 after leaving well after 08h00 (day break was only around 07h00.) I was working on around 1 hour to walk 5 km. Then day 4 was when the wheels came off and every step was pure agony. I was concerned as in less than 3 months I was on my way to Russia to climb Mt Elbrus, the highest point in Europe for charity. My pre-hospital medical training and my work as a qualified but no longer practicing Sports & Rehabilitation Therapist was warning me of an impending stress fracture - but I chose to ignore it and push on. Not the brightest move, but I am bull headed - all or nothing.
 |
| Image Kim Williams |
Please note: I am no expert in the Tankwa Camino however I am a qualified Advanced Life Support Paramedic, Adventurer, Amateur Mountaineer, hiker and a qualified Sports & Rehabilitation Therapist but no longer practice as one as I am too busy have far too much fun as a Paramedic in Hillbrow dodging bullets and staying alive. I will do my best to share what I learnt and saw on the trip between the haze of painkillers, steaming foot baths and wondering what the hell I was doing to my body. I should know better but I did it anyway!
The Tankwa Camino - The walk - what surface will we be walking on:
If I had known that this was what I would be walking on I would have trained very differently. For some reason looking at all the photos and magazine articles I was under the impression that we would also be off-road walking on paths and trails between mountains. You will walk an average of 30 km a day for 9 days and 15 km on the last day with a backpack on dusty, hard and uneven roads that are mostly made up of corrugated ridges. You will crisscross all over the road to find the most comfortable and even part of the road to walk on. Your feet will sweat and slide from side to side. Remember this is essentially a slack-packing event. This means that all your luggage, camping equipment, food and supplies are transported for you to the next camp. In this case huge big trucks which means you do not carry a heavy pack unless you are stupid like me who used this as a training camp for Elbrus - epic fail!!.
 |
| Image Kim Williams |
 |
| Image Kim Williams |
The road is marked every 5 km or so with a red flag/ yellow "km" board and most times the green loos will be erected around the 5 km mark. These green loos, with fantastic views, no books required, become your landmark and your goal. Most people will take off their shoes, elevate their feet and take a 10 to 30 min breather. This is highly recommended something that I did not do enough of in the early days and paid for it later. It is not a race and there no stopwatch, no podium at the end, no medal to prove your valor. Your victory is within and private, deep within your soul and mind while your body may or may not fall apart. So if you need to stand on a podium and say you won a leg then this might not be for you, this Tankwa Camino is all soul and guts but no glory.
 |
| Image Kim Williams |
Everyone leaves at a different time, a race is when everyone starts on equal footing and at the same time. So take it easy it is a long and hard stroll in a beautiful but tough desert, the crows are watching you!. Go at your own comfortable pace. You will notice that you will be passed by people only to find yourself passing them while they are lying on the side of the road resting or dying - everything becomes relative. This is the pattern for the day and the rest of the walk. So you may finish long before people who started before you or even after you. What seemed to work the best was to walk to each 5 km stop, go to the loo, find a spot to rest, take your shoes and socks off, elevate your feet up against the fence (I massaged my feet and dug them into the wire and poles to relieve the pressure points). I lay down on my hiking mat and watched the clouds - was very peaceful. This was a good time to take in fluids, some nourishment and reflect.
 |
| Image Kim Williams |
I can only sit still for a short time so in the beginning this was one of the reasons why I did not rest or lie down often enough - the rest would last 3 minutes which felt like hours after checking my watch every 10 seconds. Lunchtime people even heated up their meals on hiking stoves, others carried hot water in flasks to make tea, coffee or hot chocolate. I stared at them in awe, flipping high teas in the Tankwa. Awesome! I had brought all the stuff with me to do just that but for some reason I never did. I would have fared a lot better if I had chilled a bit more and not been on my "on a mission brain". So learn from my mistake make this a fun experience, this is the Karoo everything works slowly so get into the grove and go slow.
 |
| Image Kim Williams |
Be prepared to walk alone. Even if you have come with a group or a mate at some time you may have to separate. At times you hook up with groups only to either leave them behind or they you. This is not a race and everyone can start when they want to. It may be helpful to hook up with a group (this can change from day to day) of people or a single person who is walking at your pace and stick with them. When the going gets tough its great to have someone to chat to and take your mind off the pain and discomfort. You do not have to talk each other to death, just having another human close by will be enough. Some people had headphones and listened to bible readings, books, music etc. Break the day into segments according to kilometers and at times you will break it down to 1 km at a time. If you are a slow walker then leave earlier as your goal should be to get to camp before its dark and get you tent up.
 |
| Image Kim Williams |
the most exiting thing was been attacked by a large ant - the bite hurt! - so look where you lie down for ants and other critters. Remember to pick up all you rubbish - plasters and waste - keep a zip loc bag in your backpack for this. Don't worry you do not have to pick up your poop if you don't make it to the green loos, please try to dig a hole with a rock, your shoes etc squat and aim and poop in the little hole and cover it up as best as you can - if you can put a rock over it even better!
Taking Care of your feet:
 |
| I used the white broad plaster you see on my feet. I single piece under the ball of my feet and wrapped around to the top of my foot (don't completely wrap the foot - or it will cut off the circulation when the foot swells) and again under my heels which prevented further blisters and covered the healing ones rather nicely. On the heel I had a blister plaster with the white broad plaster covering it. I used gentian violet and Merthiolate spray on my feet to dry them out and keep clean. Note my nail polish stayed intact the whole way though - I'm just saying in case you where wondering. The socks in the pic are my Mohair ladies hiking socks from Hi-tech. I use both First Accent and Hi-tech Mohair Hiking & Extreme Mountain socks. Image Kim Williams |
I made a stupid rookie mistake, yipe I did, by trying something new on the first day. I was so focused on the blister drama that I panicked and did not stick to my game plan - what works for me - my tried and tested routine that worked on Kilimanjaro, many times in the "berg", on multiple day hikes and even on a European Ultra mountain more than once. "Oh no" my brain screamed out in a panic and I bought pairs and pairs of nylon knee high stockings. So I put on stockings after the Vaseline, then my inner socks then my thicker socks then my boots. And 5km in bamm... it happened, blisters, yipe. The Nylon had "burned" under my feet. They were red, raw and very sensitive. I was the Queen of Idiots in that moment. Stupid, Stupid, Stupid!! I took them off and returned to my usual routine but it did cause blisters that hurt for a few days then eased off. I have to wonder would my injuries have progressed to the nightmare they did in the end if I had not had to to compensate for the discomfort of the blisters so early in the game, leading to my altered gait.
 |
| Image Kim Williams |
When you stop for your breaks check you feet and address any issues like blisters - carry lots of blister plasters (I bought 2 boxes it was not enough - 4 boxes would have been better). carry a small first aid kit with you - inside pack a blister kit, pain killers, re-hydrate sachet, sports pray/gel etc to rub on you calves and feet, small scissors or nail clippers to sort out broken toe tails and cut the broad plaster roll,
Vaseline to rub over your feet once they are dry. I found that the wide broad roll plasters worked the best to cover hot spots and blisters - See photo above of my feet and read caption.
 |
| Image Google |
Some walkers rubbed dubbin on their feet some 2 weeks leading up to the event and continued to do so not getting a blister. (I usually do this when I am leaving for a mountain expedition that involves snow and cold). Another lady who also never got blisters took a plastic zip loc bag with mentholated spirits poured into the bag and would soak her feet, then rub camphor foot rub on. Again if you are going to try something don't try it a few days before you leave - you need to try out what works for you long before your event. There are many old wives tales, home remedies, quick cures, miracles creams, blister prevention sprays and socks and empty promises - again find what works for you and stick to it. We all have a combination of different elements - skin, gait, size, shape, endurance, injuries, shoes etc that make our situation unique what works for your buddy may not work for you.
 |
| Inner and outer socks Google Image |
What socks? Yes socks are important, Ill-fitting socks cause blisters and socks with uncomfortable seams day in and day out as well as uncomfortable ridges in your inner soles of your shoes can lead to stress fractures and repetitive strain injuries. So make sure the soles of your shoes are smooth and soft, put in new inner soles if you have to and most certainly bring new inner soles along for added comfort and in case your shoes give up you can still use them. Any small irritant in the inside of your shoe will become debilitating in a demanding event like this one. So fix it before you go. Some people had to resort to duck-tape to patch up and keep shoes together. This road is notorious for shredding car tyres so don't think your shoes are safe, that is why carrying a spare pair just in case is a good idea.
 |
| Image Google |
I usually rub lots of Vaseline on my feet, (keeps them warm and prevents rubbing when socks are wet) then I put on sock inners or thinner bamboo socks without seams (can be bought at sports and outdoor places), then my thicker hiking socks - I prefer the Mohair ones for this purpose. Also make sure your socks are not tight as this also will lead to pain as your foot feels like you have a vice-grip around it - carry an extra dry pair of socks in your backpack if you need to swap them around. My boots are a size bigger. It is important to have shoes/boots that are properly tied up. If they are too loose blisters and twisted ankles will occur. It also increased the likelihood of stones and sand getting into your shoes and socks. If you shoes are too tight they will cause pain on the top of your foot that will eventually bring you to your knees in a repetitive endurance event like this one. There are countless ways of tying your shoes and you need to find one that works for you. Make sure your laces are not tight over the top of your foot then when you secure your laces create a loop technique and thread your laces through the loops. This technique prevents the back of the foot from sliding all over the place and that blister on your back of the heel. You can also loosen the tops of your laces quiet a bit to accommodate the swelling in your feet and ankles that you probably will get. Now you know why your running shoes or hiking boots have an extra hole on the side! Neat hey?
 |
| The holes are used to create loops, then you lace your shoelaces through those loops and finish up by tying your laces as you normally would. this technique is called the heel lock or lace lock. Image google |
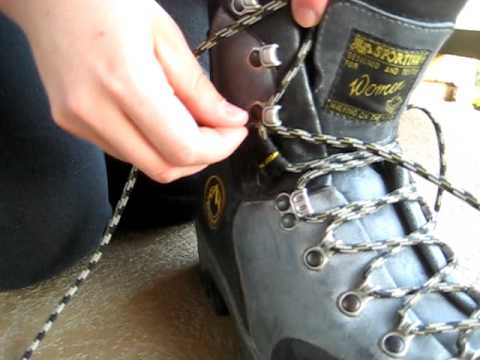 |
There are many different ways to tie up hiking boots to address various problems you may have - I tie mine the same way as I do my running/walking shoes with the loop or like the one above which helps to prevent blisters. - you need to find what works for you during your training hikes - google the different techniques and view them on YouTube - Image Google.
What many did and it seemed to help and certainly bailed me out was to take at least 3 pairs of trusted shoes along to swap around. When blisters develop then wearing an outdoor/sport sandal is heaven and gives your feet a chance to heel. Some walked in sandals like seen in picture 1 and 2 with great success. I alternated between my 2 pairs of hiking boots and my Hi-tech sandals similar to the ones in picture 3. My advice would be to try out various shoes/sandals and walk a minimum of 30 km on gravel road to test them.
|


Above Images Google Fig 1 Fig 2 Fig 3
Do not go for a pedicure just before you leave, if you have any "nic's" or soreness this will only add to your woes. I normally start preparing my feet a month before cutting the toes nails up until 5 days for the last time before I actually start. Remember to cut your nails short and use proper toe-nail cutters to ensure this is done properly. The cut must be straight and even across not missing any nail bits. I also will smooth my feet out. But generally all the big stuff is stopped 5 to 6 days before and then its just the Dubbin/Vaseline etc. Treat yourself to a foot massage and pedicure when you get back.
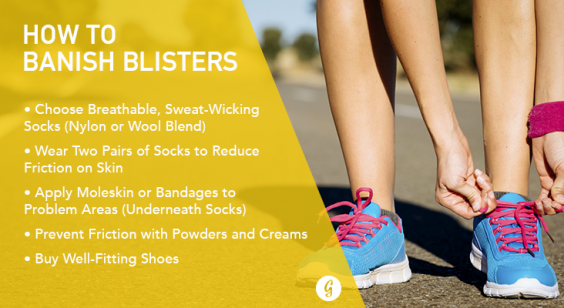
The blister issue:
Many people got blisters, some for the first time and only the rare few did not get blisters, So what was their secret. They stuck to what they know works for them. They prepared their feet weeks before the walk to toughen them up with their own methods, tried and tested and that is my point!


All above images Google
There are so many things on the market, you will need to find what works for you. Prevention is always better than cure.
 |
| Image Google |
One of my hiking buddies uses ankle guards turning them to opposite ends therefore the piece that would normally go above the ankle (the longer bit) goes over the foot and the shorted piece that normally goes on the foot is now above the ankle. She puts on Vaseline, then inner socks and her cheap white ankle guards and never gets blisters or sore feet. I could not use mine as my feet had swelled too much but it did make a difference in previous hikes for me.
 |
| Image Google |
Okay so how do these little buggers start and why do we get them.?
In simple terms a blister may form when the skin has been damaged by repeated friction or rubbing, pressure, heat, cold or chemical exposure. Fluid collects between the epidermis (the upper layer of the skin) and the layers below (5 layers of skin). This fluid cushions the tissue underneath, protecting it from further damage and allowing it to heal.
Here's how it happens. A red area called a hot spot precedes your blister. As your heel rubs against the shoe(or a strap rubs against your foot) the skin becomes irritated and inflamed. (This is when its good to put on a blister plaster or tape the area. You should check your feet every time you stop or when you feel one of these hot spots and act don't ignore - you have a long way still to go). This causes a tear to occur within the top layers of your skin, leaving a gap between the layers. Your body sends fluid to fill up this space, in order to protect it. Think of it like a small balloon under the top layer of your skin, cushioning the skin beneath.
 |
| Image Google |
 |
| Image Kim Williams - the 5L bucket is difficult to plant both feet into it - the green square folding washing container is perfect and I highly recommend it. |
As already mentioned many things are supposed to help prevent these nasty blisters. One is to soak your feet in hot water with lots of Epsom salts every day. We used to do it after our walk and it really did help. You can buy individual packets to tear open an put into the bucket. These are less messy and you don't waste as much when lugging a big box along - 2 sachets emptied into the bucket should do the job.
 |
| Google Image |
 |
| This is how you put the Moleskin when treating blister Image Google |
 |
| Okay what every gets you going - some even used duck tape and swore by it. I have never tried it and did not find much research on it so I cannot comment on it. Image Google |
 |
| Image Google |
 |
| Image Google |
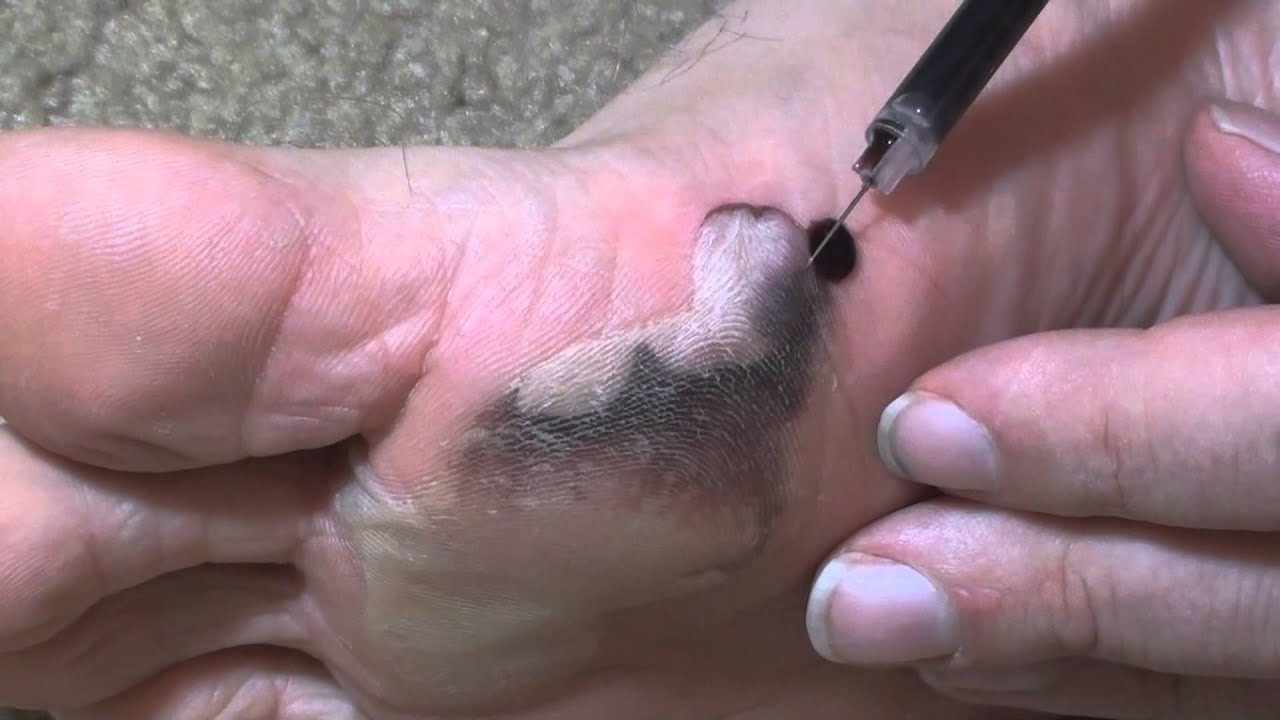
There are many thoughts on this. Some people just cover the blister and that's that. Others advise to use a syringe to draw the fluid out then dress it. Others advise injecting Merthiolate into the blister Army balls to the wall style. I did do that and thought I was going to die - the burn lasted a few seconds then was gone and it did heal them well. I made sure everything was sterile, clean needle, clean syringe, used alcohol swabs once. The needle itself did not hurt as the skin is dead. So I was wondering what the fuss was about until it bit, My eyes got very wide and nearly shot out their sockets, my blood vessels on my neck and head popped and I stopped breathing. This all lasted seconds and I held onto my foot not sure what had just happened while clenching my teeth and breaking into a sweat. but it worked for me, The blister healed so well over night that it no long hurt to walk on it. I cleaned it properly and dressed it. I was so traumatized I only attended to 1 blister and took a shot of port!
 |
| Image Google |
The next day I had to address another blister but now I was far to chicken to do the Merthiolate torture again so I tried the threading thing. I used a sterilized needle and cotton which I wiped down only once with a alcohol swab. I had brought sterile paper sheet to work on and to put my feet on (you can buy something similar from Dischem). Again the needle going in and out the blister did not hurt at all, nor did threading the cotton through. I tied a loose knot at the ends ( did not want the thread to come out as the bits hanging out tend to catch on things - I covered my foot with a clean sock) and soon the fluid was leaking out following the thread. By morning the blister was almost flat and not at all painful to walk on. If you use any of these methods or any other invasive methods please make sure that everything is clean - 2 people had to leave one to hospital due to infected blisters many others took antibiotics. I never got any infections or inflammation, it pays to do it property. It is also important not to cut the skin covering blister off, you expose the raw and very tender skin underneath it which will cause you more pain as well as set you up for infection.
What food and snacks to take along?
This is very much a personal preference choice.
 |
| Photo Credit Kim Williams |
06h00 Breakfast: I woke up got coffee and one packet of plain instant oats with honey and milk. (I brought along a small squeeze bottle of honey sealed in a ziploc and 10 tiny boxes (220ml) of long-life milk.
11h00 power snack: I would take my premixed Future-life cereal made into a shake (1 ziploc bag with powered milk and Future-life already mixed together - made up 10 little bags at home before I left - and then put that into my small shaker added water and drink the shake down. It gave me energy and filled me up - I would usually have it half way.
13h00 - 14h00: Would have lunch if I was hungry which only happened from day 6 on wards - some biscuits and a packet of Tuna - was delicious when I did and wished I had done so sooner. I had a tiny very light cooler box for the lunch and this went into my waterproof hiking bag together with my snacks and treats.
 |
| Photo Credit Kim Williams |
My snacks for the 10 days was a packet of biltong/driedwors divided into 10 bags and I snacked on it 2x a day, with assorted nuts and dates. I had 1 energy bar per day (Future Life and Woolies Raw Bars). A small ziploc bag with jelly babies helped. I also ate several of those sugar coated fruit squares to help keep me regular.
You don't really work up a big appetite or use lots of energy on this walk, unlike on a hike or a run. I found that at each water stop I refilled both my bottles and then I would take an apple, a naartjie and sometimes a banana - Having 2 to 3 apples a day filled me up a lot so I hardly touched the food I brought along.
I filled one water bottle with water and dropped a re-hydrate packet into it and the other bottle had plain water. I packed a re-hydrate in my pack in case I needed it.
Backpack and Mat yes or no?
 |
| Photo Credit Kim Williams |
Some people only carried water bottles and no backpack, others took turns carrying a shared back pack within their group or pairs. Others wore a camel pack and others a day backpack. What ever you choose it must be something you are comfortable with and used to.
Personally I took my day pack with (far to heavy in the beginning but I was training for another adventure). I was glad as I could put an extra pair of shoes, rain gear and my camera in when it rained. I also had my hiking mat - Mine was a little thin and well used and sticks and thorns would puncture through it and stick into my back or bum!. I would recommend a thicker mat - some of the guys had these mats that were foil on one side and mat on the other they looked great and comfie. Other people just had a small cushion to sit on. I liked to lie down on my back with my feet up. I also took along a folded up bright pink umbrella but never used it.
The Camp site:
 |
| The red luggage cart -Photo Credit Kim Williams |
When you arrive at the campsite you can go to the mess tent and get a well earned cup of coffee/tea and a cake/Karoo sweets. Then make your way to the big truck where you find your baggage. Look out for the luggage cart (I only saw this on day 2 and had being carrying my heavy bags to my spot!). Once on the cart the luggage seems a lot lighter, careful, the cart has a mind of its own and can run you over if you don't control it!!
 |
| My blue tent with my small extra ground cover sticking out Photo Credit Kim Williams |
Once you are at your spot you will need to erect your own tent. Bring a brush and pan with to sweep the inside of your tent, it gets full of sand and in our case mud. Get a ground cover bigger than your tent (those green net ones worked really well) then put you tent on top, keeps you warmer and your tent bottom a bit drier and cleaner when folding your tent back in the morning. Also you have your own "veranda" where you can put your stuff and chair onto. Make sure your tent is waterproof and can take high winds. We had lots of tents flooded and torn due to the heavy rainfall and high winds we experienced. Use your fly-sheet as the morning dew is heavy and you and your things will get wet. Also if the wind picks up sand will pass through the vents. Make sure you have a tent that has a door and a window on the opposite side so you can have both open on those warm afternoons and nights.The temperatures do drop at night even on the warmer day.
 |
| Photo Credit Kim Williams |
I saw many tents and I found one that I will be going to buy for my future hiking trips it is much lighter (2.4kg) and bigger than my current 2 man tent. This tent never got wet and damaged during the sandstorm and flooding and was the most popular one there. Easy to erect and take down. If you are not used to making up your tent or have difficulties then rather use a pop up tent. A lot of the ladies used them and I was always envious as to how quickly their tents went up with very little effort. Practice putting up and taking down your tent - and rolling it up back into its bag at home. Many people had never camped before let alone put up a tent. You are tired and the last thing you want to do is take you tent out for the very first time at camp 1.
 |
| the poplular K-Way tent |
Make sure you have a comfortable bed - some had blow up mattresses some even brought along a camping stretcher. If you bring a blow up mattress try to get one of those pumps you don't have to bend over (kills your back) rather one that you can sit while pumping up the mattress, others used "space blankets" "emergency blankets" under their mattresses for extra insulation (buy from Dischem or outdoor places). Bring a mattress repair kit and duck tape, there are thorns in the desert.
 |
| Photo Credit Kim Williams |
When you are not in your tent keep it zipped up to avoid sand from being blown in and also there are little critters running around like mice and as much as I love them would not enjoy sharing my bed with one.
Keep some shoes and a torch handy if you need to go to the loo in the middle of the night. Lots of rocky bits, hard bushes etc to hurt your feet on. Talking about loo's as someone who spends a lot of time in the bush my advice is pack wet-wipes, they are great to give your butt a wipe to keep you smelling fresh after you are done in the loo. You only get to wash once a day. The wet wipes will also be used to wipe your hands afterwards. I used to keep a mug of water on top of my plastic 50L container and use it to wipe my face and hands first thing in the morning.
 |
| Photo Credit Kim Williams |
Bathing involved taking your 5l bucket to the big fires where huge pots were boiling water. Once you have added the hot water a few metres away you will find a tap where you can add some cold water. I loved bubble baths and girly soaps so I took along my favorite shower gels, my thick face cloth and sponge on a rope so I could hang it up to dry. I brought along 2 camping towels one to sit on and one to dry myself with. I sat on a cushion in the middle of my tent. I would use the hot water afterwards for another Epson salts foot soak. Before I used up the water I would take some out to brush the teeth and wash my hands (I wear contact lenses so needed to make sure before I went to bed I had clean hands and nails (I brought along a nail brush) to take my lenses out and repeated the process in the morning. I am often asked about what to do should you menstruate during an adventure especially during a remote adventure where personal hygiene is a challenge. Most of the talks given are by men so this topic is never addressed. here is my take on it. Rather use sanitary pads not Tampons/Lilets as you run the risk of infection and septicemia. The first time I climbed Kilimanjaro my climbing partner had her period, She used Tampons and we went through a 19 hour blizzard and bad weather with no bushes, rocks for her to change, it was a fight for survival, hypothermia and frostbite. Nor could she use clean hands when she was able to change. I know this is a bit too much information for you boys reading this but this is a reality that many women face and its important to be informed and make your own personal choices from it, it could save your life. My climbing partner ended up with septicemia and nearly died, she had to be rescued off the mountain and seek emergency medical help. It took her months to recover fully. Take along those ziploc bags and those nappy bags to get rid of your waste. Another tip for the ladies is take along medication should you start with a bladder infection which is common on trips like this. You will find yourself holding your pee in until you get to the green loos as most of the time you will not find a bush to shield yourself - and if you find one you can bet everyone is resting under it or next to it.
 |
| Photo Credit Kim Williams |
Make sure your tent pegs are deep into the ground and you put your flysheet on properly to prevent the condensation from wetting the inside of your tent and you bags. Bring a mallet (rubber hammer just like Thor's) with to knock the pegs in and buy extra pegs (strong ones as the ground is hard) and duck tape to replace and repair. Just a tip - tap gently with the mallet as you hammer in the tent pegs bit by bit, just hammering them in violently will bend them then you are stuffed! Once its 3/4 in then bang in the last bit. Also keep a spare tent peg to use as a hook to pull the pegs out in the morning. Also some cord to replace any broken tent cord. Some people had their tents badly damaged and bits blown away so they slept under the trucks for the rest of the walk.
 |
| Photo Credit Kim Williams |
You will need to pack your tent away and take all your luggage back to the truck so don't camp too far from the truck!
Near the truck a shower had been set up so you would take along your 5lt bucket with hot water and hop inside and have a makeshift outdoor shower under the Karoo sun or stars, great to wash your hair!! Don't camp too close to this shower as the water runs out and it will run under your tent!
At the end of the day as I lay in my tent I would fill in my blog journal then call it a day. I brought along some cards and a book when I wanted to spend time alone.
Extra:
Staff tip:
All expeditions and treks all over the world require that you pay a small amount towards the work that the Sherpa's, porters and camp staff have done for you. This is usually paid on the 2nd to last day followed by celebrations and thanks. So take some cash along to put into the "kitti" for the Tankwa camp staff. I felt really sorry for our guys they were up by 04h30 in the cold and dark to start the fires, have hot water ready for us and coffee/tea set out. Once we had all left they would then break down camp, load the trucks, while others broke down the toilets, bagged our poop and dug holes and buried our poop with biodegradable chemicals, then clean up the loos and make their way to the next camp and as they arrived they would set up camp quickly. the mess tents ups, the fires on the go, holes dug into the ground to bake Karoo bread, preparation of our delicious dinners and the baking/cooking of our arrival treats.
 |
| Photo Credit Kim Williams |
They would also set up the toilets along the way as well as have to dig holes and empty all our poop, clean up the loos then pack them up only to set them up at our next camp. This was a real crappy job, pun intended and just for this alone they need a pat on the back. Many tired and weary walkers coming in late myself included, the staff would be only to happy to assist in setting up your tent and carry your luggage to your spot.
The iteniary - what to expect:
The night before we all met at the church hall for registration and a group dinner- within walking distance from most of the B&Bs and Calvinia Hotel.


(Photo Credits: Tankwa Camino)
- We received a name tag, a red flag on a long pole (you pop this into your backpack - this alerts drivers of the group of walkers ahead, also sticks out when you take a break on the road hidden from view or passed out on the side of the road).
- Your bus tickets/passes (please take this with you and keep it in a safe place you will need to show this to the bus drivers on your return to Calvinia).
- Your green Tankwa passport card (this gets stamped every leg you complete - the stamp will be in the mess tent during the journey).
- Information pamphlets about Calvinia, the Western and Northern Cape.
- We got a small bottle of port - perfect for a wee glass for those chilly camp nights.
- A Tankwa Camino T-Shirt.


(Photo credits: Tankwa Camino)
The day has arrived: Day 1 the Start: We met back again at the church hall to drop off our bags and equipment - make sure everything is clearly marked - everyone joked that you could see I was from Johannesburg - everything was cable tied and had padlocks firmly attached!. I took 2 red pep bags - 1 had all my cloths, toiletries and medication in. The other had my tent, sleeping bag, mattress, camping equipment and chair - so I did not have loose bits all over the place. Then I had a yellow 50l box with my food in it. What we did was load our cars up then drive to the church hall, offload and return our cars back to our hotel. All the places accommodated our cars and kept them safe for our return. We then had breakfast at our hotels/B&B's.


 |
| Photo Credits: Tankwa Camino |
By 08h30 we had walked to the start, meeting at the very large red post box (hard to miss)
 |
| The Team Photo: Credit Tankwa Camino |
Then we were off - you start you journey on a tar road for the first few kilometres then turn off to the left onto the famous dirt road - welcome to the longest uninterrupted dirt road in South Africa.


(Photo Credits: Tankwa Camino)


(Photo Crecits: Tankwa Camino)


Camp 1
 |
| The ground was hard here and most were unable to knock their tent pegs into the ground. We were lucky the wind was gentle. Ground was flat but lots of small sharp rocks. Look for the bigger rocks to hold the corners of your tent down and put heavy bags into the inside corners of your tent. Wind came up in the morning and it was a bit of a challenge to break the tent down. Photo Credit: Kim Williams |
 |
| We camped in a quarry which offered shelter during a hectic electrical and sandstorm with strong winds, however tents still got blown down and damaged. The ground here is softer in some spots and harder in others. Find a flat spot as the ground does tend to slope. |
Camp 3:
 |
| The ground was flat here and firm and it was easier to put the tent pegs into the ground. You are able to spread out here. Also note there is an abandoned farm house where some of the guys who had damaged and wet tents camped inside. |
 |
| We all had the best nights sleep here, no wind, large open spaces and place to wash and hang up clothing. Everyone was in good spirits and the ground is flat and soft. |
 |
| The ground was a bit rougher here and you had to find a flat piece wide enough between all the fynbos. You could also hang out cloths on the fence and spread the camp out a bit. |
 |
| Again wide spaces to find a spot, the ground was softer here and flatter. |
 |
| The ground appeared flat here but was not, and a bit harder than last nights camp. Lots of ground cover to negotiate. |
 |
| The ground is soft and flat, but the space is very small and sheltered from the elements.Keep you tent ropes a bit shorter and closer to your tent to prevent everyone tripping over them. Watch out for the very cute field mice living in the creepers on the wall you see in the background where all the fly sheets are busy drying out. Keep you tent zipped up and snacks off the ground. This was a very cozy campsite and by now everyone is used to each other so lots of chatting, interaction and laughter happening at this stage.. |
 |
| This was our final camp - Heaven - lots of green thick soft grass (hard to pitch your tent poles into but it's sheltered here). Running water and a spectacular dam with frogs to serenade you as you sleep. Has great photo ops! You have electricity, you can charge you phones, you have cell reception and best off all a flushing loo and hot shower awaits you. The farmer who owns this piece of heaven was quiet cute, a bit of eye candy after surviving 9 days in the desert with the road rats for company. I did not get his name or if he was married - I though about hooking my daughter up as this would be a great place for weekends! A mom can dream! |


- lantern to hang up inside my tent (roof) - uses batteries- paid R75.00 for it at Sportsmen Warehouse (ladies take note - lamps in the tent light up your shadow inside the tent so people will see your naked shadow and butt, the solution is this lantern hanging above your head. You can also adjust the light to bright to very dim for extra privacy.
- thick thermal socks - 1 pr to sleep in - R89 from Dischem
- thermal beanie
- flask in tent - was great to take hot water back with me to the tent for some late night hot chocolate and that first cup of coffee while you dressed and sorted yourself out in the mornings. This was a small hiking flask and I put it into my backpack to have a cup of tea on the one cold and rainy day - does not weigh much- bought it from Trappers for R99
- Waterproof bags - you can never have enough of these. they come in S M L XL with either tie sting end or a you roll and clip the end. They can be used to keep all important clothing and equipment dry. Use the small ones for snacks and food in your backpack - stops stuff leaking into your bag. Prices range from R79 to R290 depending on the make from most outdoor shops.
- Make sure you label all your bags or colour code them - when you are tired you will spend a lot of unproductive time digging into you bags pulling stuff out and back in again and still not find what you are looking for.
- Large tent: I was able to comfortably bath myself (stand up in tent) and keep all my stuff inside the tent to keep eveything dry overnight and away from mice.
- Blow up mattress: just the standing up with back bent to pump it up was not great so I suggest a smaller hand held pump would be better. Take repair kit with. I had a comfortable sleep every night and not once had a sore back.
- -18 Sleeping bag: ok so this is the desert might have been excessive but I was only hot one night (my husband may beg to differ) then it was really cold the other nights and I just had my PJ's on, socks and beanie and was really snug and grateful I had brought it along!
- Sandals: God send on those days when your feet were blistered and swollen. Also great for around the camp with you socks on.
- Scrubbing brush: dirt and dust gets in under your nails and I wear contact lenses so it is really important for my nails to be clean. I also misplaced my toothbrush so used it as a toothbrush for one of the mornings!
- Face cloth and sponge with my favorite gel soaps: ( took 3 different ones decanted into small travel bottles) you might not look good but if you smell good you feel better and refreshed!
- Wet wipes - I buy 2 types the ones for feminine hygiene/sensitive and "normal" ones. I buy 2 small packs to carry in my backpack and 2 large packs kept in my tent. For washing up and for freshening up after using the loo (for the hands and the butt).
- Comfie PJ;s: being comfortable at night was important to me!
- Camp Cloths: old tracksuit - once I had bathed I put these on to kept me warm, snug and descent to walk around in the camp in front of everyone.
- Plasters: you canot have enough blister plasters, they ready did help - Also the board tape on the roll was a winner for me.
- Painkillers and anti-inflammatories tablets and sports sprays (TransAct patches)
- Baldder infection Tabs: I always take along my little brown bladder tablets in case I get a bladder infection.
- Food: Instant oats, Future Life shakes, 200ml long life milk, hot chocolate
- Journal, cards and a book
- 2 flat square cushions with ties - used them as extra pillow comfort on my outdoor fold up chair and to sit on or to kneel on while inside my tent among other uses.
- Brush and pan: to clean out the tent
- Mallet - rubber headed hammer to hit your tent pegs in.
- Extra tent pegs: (actually bought at Pep stores they were extra strong!)
- Camp cloth: to clean up around camp and wipe dew down inside of tent - with the dust and dew the tents can get a little muddy.
- Fold up chair:
- Solar power bank: to charge your gadgets (I used RED paid less than R400 for it)
- 5 L fold up camping bucket: to use when bathing paid R150
- Green folding square container: (normally used to wash dishes with) both your feet can fit into it.
- Threading my blisters and injecting Merthiolate actually helped me and I dressed with gentian violet and plasters. Using alcohol swabs to clean.
- Cloths Pegs and a small ziploc bag with washing powder.
- Waterproof (huge) bag to line your bag kept everything extra dry! Also if your bag rips or the zip breaks this is your backup plan!

- 5 lt bucket to soak feet in - did not work because your feet don't fit in (I'm a size 5 foot) and the feet distort the shape and the bucket buckles letting the water run out. You then have to keep you feet lifted up which is tiring.
- heavy hiking boots: I would have fared better with cross trainers this is a walk not a hike or trek in the mountains.
- nylon stokings - they caused friction, burnt the under part of my feets and gave me blisters on the balls of my feet (both feet) and both heels
- camping stove: because I had the flask that I could fill up hot water and take with me. Also I was not that hungry and snack food was enough What others did was cook their breakfast and lunches on it, but as a group so they washed and packed up together making up time.
- heavy back bag: 20kg - 15kg - 10 kg then to 8kg (had small scale with me)
- too much food - I brought back an almost full 50L - we got enough food and fruit
Blog Links
should you wish to donate to the new ICU wing for the Children s Red Cross Hospital please follow the following link on Back-a-Buddy:
https://www.backabuddy.co.za/champion/project/adventure-with-a-purpose


